
The best way to protect your photos from being stolen or used maliciously – whether they are of your services or products – is to add a watermark to them. But how do you actually make a watermark that you can then add to your images? That’s what we are going to outline in this blog post.
When we publish photos online, either on our blog or social media, it’s normal to feel concerned about what’s going to happen to our pictures. It’s common for people to steal images and use them as if they were their own, while others might try to take credit for your products or services.
Whether you’re a photographer or a bakery, it’s natural to want to protect the photos of the products and/or services you worked so hard to create. Hence, you want to learn how you can easily add watermarks to your photos. There are several options to watermark photos using software you probably already own. In this post, you will learn some of the best ways to do it, even if you’re not a Photoshop pro.
Keep reading to find out:
What Is a Watermark?
Watermarks can be a logo, a signature, or a stamp that is placed onto a photo. The two main reasons people use watermarks are:
1. to protect their photos so people can’t use them and pass them off as their own; or
2. to make it easy for people to identify your work even if it is shared without your consent.
Let’s say you’re a painter and you sell your paintings on Etsy or on your own website. At some point, someone finds your paintings, and they love them. They get inspired to paint and because they’re inspired, they decide to save images of your paintings on Etsy to their own Pinterest board. Nothing wrong with that, right?
Well, because you didn’t watermark your photos, when other people discover them on Pinterest, no one will know where the image came from. There’s a chance people who see your painting on that platform will want to buy it, but won’t be able to since they don’t know where the photo of the painting originated.
This is why watermarking photos is so important.
The Ideal Watermark
It doesn’t matter the kind of watermark you use. Some people choose to use their logo and some people simply go with a text watermark. Either way, there are some basic principles to keep in mind in order to create the ideal watermark.

For starters, the best kinds of watermarks don’t distract people from the actual photo. The perfect watermark is easy to see and read, but doesn’t make the photo look worse.
A common mistake has to do with size. People assume that they need to add a huge watermark right in the middle of the picture to prevent it from being stolen.
The fact is, not everyone is going to go out of their way to steal your images and pass them off as their own. A small watermark is enough to let people know the photo belongs to you. Plus, if you create an ugly watermark that covers the whole photo, it might actually repel potential buyers rather than attract them.
People want to be able to see your photos. You shouldn’t make people struggle to see the photo behind the watermark. The goal is to share your work with a discrete watermark.
The good news is, if you already have a logo, you can use it as your watermark fairly easily. Just make it small and place it in one of the corners (the best place to add a watermark is in the bottom right corner).
The perfect watermark doesn’t distract people from the actual photo. It is easy to see and read, but doesn’t make the photo look worse.
If you don’t want to use a logo (or don’t have one) be sure your watermark resonates with your brand. A good rule of thumb is to use the same fonts and colors you use on your website or other branding materials.
Logos are probably the easiest way to go, however, if you don’t have one and you think it’s time to get one, you should check out this post to learn how to create a logo for your small business.
Remember: creating a logo is a big step in your branding process. You don’t want to just create one on the fly because you need to watermark a photo. You’ll want to make sure to choose a font and a style that represents your brand and will be relevant for years to come. You don’t want to be constantly changing your logos and fonts. This creates inconsistency and confusion and can come across as unprofessional.
Once you have defined your logo and fonts, you can create a watermark that will last long.
5 Essential Tips for the Perfect Watermark
- Create a watermark and stick to it: whether you decide to use a logo or text watermark, you want to be consistent. This shows professionalism and brand consistency;
- Make it legible: you can use your name or your website’s URL. Either way, it should be very easy to read;
- Make it discrete: people want to see your photos, products, or work, not the watermark. Huge watermarks ruin the customer experience;
- Reduce opacity: if your watermark is too opaque, it might draw too much attention. Try reducing the opacity a little bit. Depending on the watermark, you might lose some elements when you do this, so play around with the balance until you find something that works.
- Be aware of the positioning: Poor positioning might end up hiding your watermark. Make sure it’s easy for people to see but doesn’t ruin the photo.
How to Make a Watermark
Okay, now that you’ve learned the basics elements that go into creating the perfect watermark, you must be wondering how to actually create one and place it on your photos. Even if you already have a logo, you have to turn it into a watermark. You can do this on your laptop with software you might already have installed, or you can use free online tools or smartphone apps.
Making a Watermark Using Lightroom

You might have heard of Lightroom before. It’s the go-to editing software for photographers, but it can also be a fantastic tool for easily adding watermarks to photos. However, if you’re not a photographer and don’t need advanced editing tools, this might not be a program you have or want to learn how to use. If that’s the case, you can skip to the next section.
However, if you’re interested in using this tool to add watermarks, it’s a great choice since it makes this task pretty easy and you can actually edit your photos in batches, saving time.
You can download Adobe Lightroom from their website for a monthly subscription. They have several packages to choose from, so take a look and choose the option that works best for you. Once you have the program downloaded and installed, it’s time to create your custom watermark and add it to your images. Here’s how to do it:
- Open Lightroom and on your Mac, go to Lightroom > Edit Watermarks or on a PC, go to Edit > Edit Watermarks.
- On the popup window, you can choose which text you want to use (your name, your website URL, etc.), or you can choose to use an image (like a logo);
- In both cases, you can select values like font size, opacity, angle, proportion, and the position of the watermark.
- After setting up your watermark, save it;
- Once you’re done editing your photos you can select the images you’d like to export and choose Export in the menu;
- On the popup window, go to the option “Watermark” and select the watermark you’ve just created.
Making a Watermark with the Watermark App
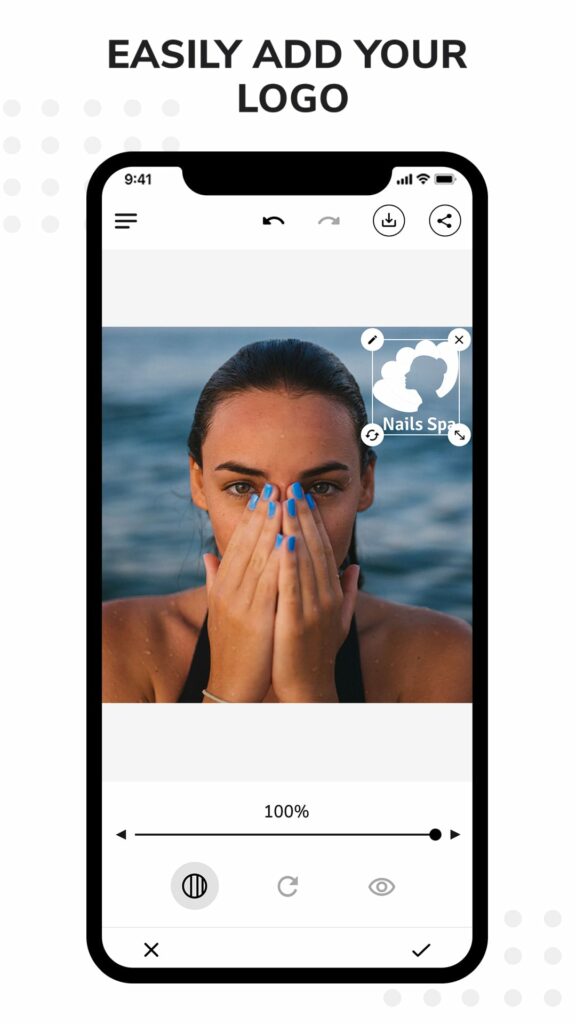
Nowadays, most people use their phones to take pictures – even professional ones! We are always on the go, so why not use an app that can make watermarking easy?
The Watermark App is a great way to add watermarks to your pictures using your smartphone. The app offers a great variety of font options and it gives you the option to crop and resize photos in different proportions and sizes for your various social media channels.
But, of course, the best feature is the ability to easily add your own logo, text, or phone number to your photos. The app makes this very easy. You can change the size, position, rotation, and opacity very intuitively and you can save your watermarked photos right on your smartphone or share them directly to social media. Here’s how:
- Download and open the app (you can download it for Android or iOS);
- Your photo gallery will automatically load;
- Choose the photo you want to watermark;
- Go to the “Logos” tab and upload your logo to the logo gallery;
- Add your logo to your photo, position it, resize it and choose the right opacity;
- Once you’re done, you can save it on your gallery or share your images with the world on social media.
See? Watermarking your photos doesn’t need to be complicated. In fact, it’s pretty easy, isn’t it?
Did you like these tips?! Then don’t forget to save the image below in your “Watermark Tips” board on Pinterest! Also, check out our Pinterest page and follow us to get daily updates + digital marketing and social media tips for small businesses!

We love to see your businesses succeed. Leave a comment and share your story with us, especially if you used this article to create your watermark!